The key to the kingdom
otpauth://totp/Example:alice@google.com?secret=JBSWY3DPEHPK3PXP&issuer=Example // uri
What would happen if your mobile device gets destroyed or stolen ? No problem if you have backup.
But just think for one blink about the impact: all the accounts might not easily be accessible, since you secured everything with TOTP. Think about the conversion you had in all your messengers and all the tokens, secrets, passwords, certificates from other apps.
Somehow scary to imagine that you heavily rely on a device you can’t easily control. In times when the price of 0days drops and mobile attacks are increasing.
The answer how to properly secure your phone will not be answered in this article nor any guidance how to jailbreak or root your device. The naive approach is similar to one of my recent articles:
Log and control everything you can. If you don’t see/log anything you’ll never know what your device is doing.
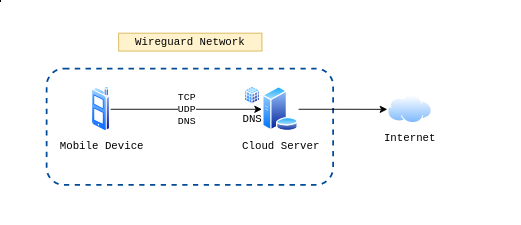
Jail your devices
If you cannot inspect the insides of the device, then at least try to monitor what you can do: DNS and Network traffic.
That brings me to todays sponsor: NordVPN. With Nordvpn you can ….
Ok jokes on me - but yes the mission is to tunnel traffic of the device to a (self) monitored network.
Limitation Unfortunately if an attacker is able to fully compromise the device, then bypassing the network will be easy. Additionally, other communication methods such as Bluetooth, SMS, MMS, GPS (and many more1) might also be used to establish a command-and-control channel.
Setup
Create a cloud instance from your most trusted provider:
- Install WireGuard
- Harden and secure the instance
- Start logger and DNS server
- Autostart everything
- Log everything
Install WireGuard
To install WireGuard the Ansible role from githubixx can be used. Simply create a small playbook using the role to install WireGuard on the server. As an alternative the Quickstart can also be used to setup WireGuard.
# pc
ansible-playbook wireguard.yml -i cloud_inventory
If you are a friend of the whale - you can also setup WireGuard easily with docker:
Configure the server
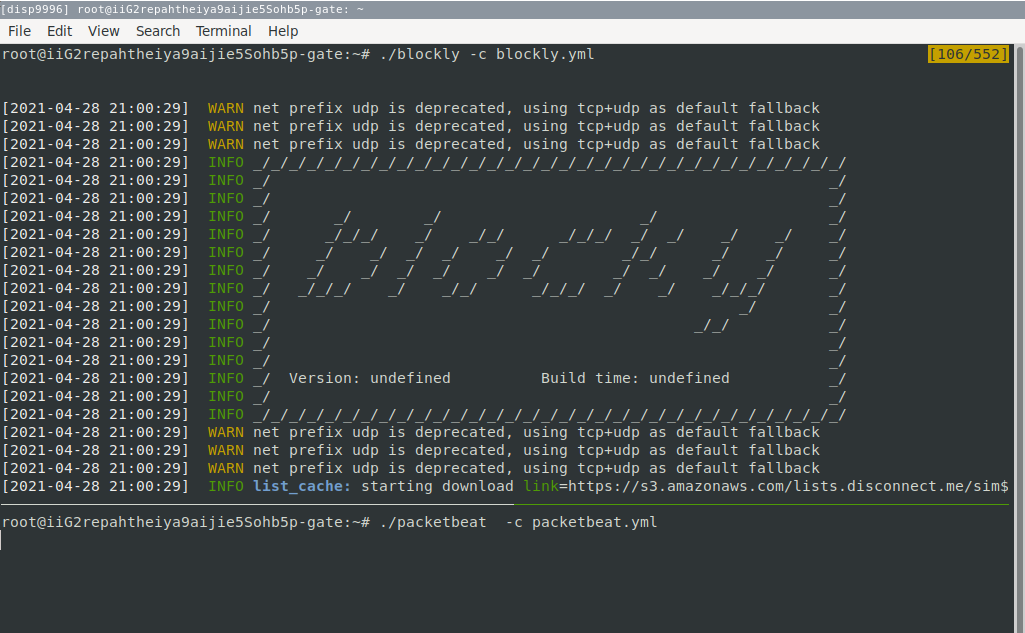
Run packetbeat and blockly for this instance.
iptables -I OUTPUT -d 169.254.169.254 -j DROP
iptables-save > /etc/iptables/rules.v4

# check if everything is ok
blockly -c blockly.yml & sudo packetbeat -c packetbeat.yml
Additionally, SSH login notifications can be enabled:
This can be created via a pam.d line to execute a tiny script, which sends a notification to several devices:
cat <<'EOF' | sudo tee /etc/ssh/scripts/sshnotify.sh
if [ "$PAM_TYPE" != "close_session" ]; then
    jq -n -c --arg user "${PAM_USER}" \
            --arg ip "${PAM_RHOST}" \
            --arg using "${SSH_AUTH_INFO_0}" \
            '{text: ["This is",$user,"from",$ip,"using:",$using]|join(" ")}' \
    | curl -X POST -H 'Content-Type: application/json' -d @- -s -q \
    "https://<endpoint>/hooks/<hook-id>"
fi
EOF

sudo chmod u+x /etc/ssh/scripts/sshnotify.sh

sudo echo "session optional pam_exec.so seteuid /etc/ssh/scripts/sshnotify.sh" >> /etc/pam.d/sshd
Now every successful SSH login will trigger the webhook script.
Start Logger Again the DNS server come handy to prevent unwanted Ads or block known bad.
Autostart
sudo systemctl enable wg-quick@wg0.service
sudo systemctl start wg-quick@wg0.service

## add packetbeat and blockly to startup
# crontab -e
@reboot /root/packetbeat -c /root/packetbeat.yml
@reboot /root/blockly -c /root/blockly.yml
Configure the device
WireGuard is supported for both iPhone and Android users:
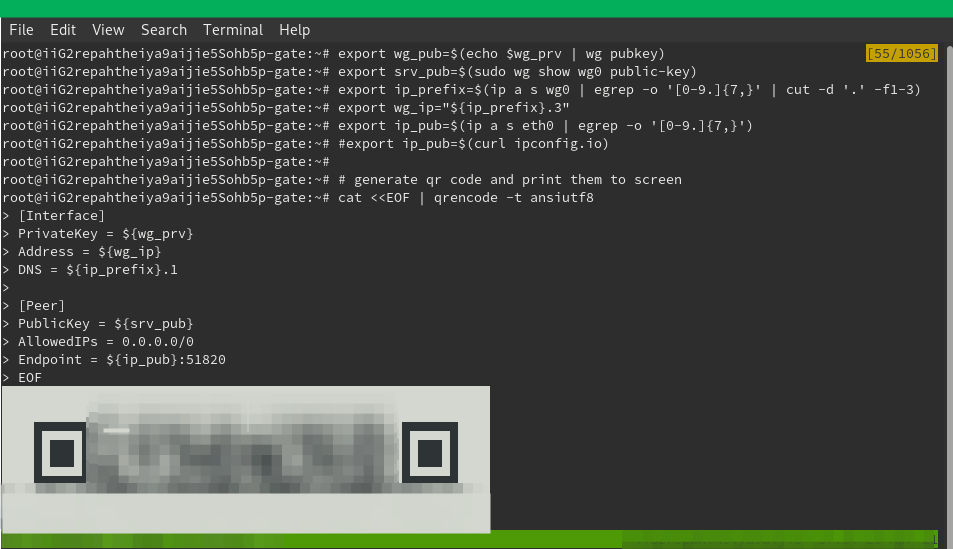
Both option support configuring WireGuard via QR code, which makes configuration very easy. You could also follow other guides for manual configuration. The following script creates a new config, generates the QR code, which is displayed as ASCII and add them to the server.
Please configure wg_ip to be unique for every qr you generate.
# on server
sudo apt install qrencode curl
sudo wg-quick up wg0

## Generate a new client config
# - internal DNS server
export wg_prv=$(wg genkey)
export wg_pub=$(echo $wg_prv | wg pubkey)
export srv_pub=$(sudo wg show wg0 public-key)
export ip_prefix=$(ip a s wg0 | egrep -o '[0-9.]{7,}' | cut -d '.' -f1-3)
export wg_ip="${ip_prefix}.3"
export ip_pub=$(ip a s eth0 | egrep -o '[0-9.]{7,}')
#export ip_pub=$(curl ipconfig.io)

# generate qr code and print them to screen
cat <<EOF | qrencode -t ansiutf8
[Interface]
PrivateKey = ${wg_prv}
Address = ${wg_ip}
DNS = ${ip_prefix}.1

[Peer]
PublicKey = ${srv_pub}
AllowedIPs = 0.0.0.0/0
Endpoint = ${ip_pub}:51820
EOF

# add publickey - e.g. 10.0.0.3
sudo wg set wg0 peer "${wg_pub}" allowed-ips "${wg_ip}"
https://serversideup.net/generating-wireguard-qr-codes-for-fast-mobile-deployments/
Summary
Setup WireGuard and configure the mobile device is not that hard. It helps in understanding what your device is doing. However, please keep the limitations in mind. A sophisticated attacker is either bypassing the logging completely or will hide in the noise and/or TLS traffic.
On the positive you also have the benefits of a custom DNS server and the ability to switch to multiple destination you can control.
One of the next article will try to report and analyze the collected (meta) data of the logs. Until then - the WireGuard

-
“[…] if you can dream it, someone has likely already done it […]” - Matt Graeber (Blackhat 2015) ↩︎